In this tutorial I’m going to show you how to load modals dynamically and how to process forms (within modals) via ajax requests.
I’m going to use Bootstrap for modals, because it’s pretty popular, but you may as well use any other UI framework or library for displaying modals.
We’ll use jQuery to send ajax and perform modal actions.
For the backend, we’ll use .NET Core MVC, but you can replace it with your technology of choice. The keypoint here for you is to find a way to return partial view (that is only HTML of a modal, without the whole layout) and to validate data.
You can find whole solution in my GitHub respository.
Setup
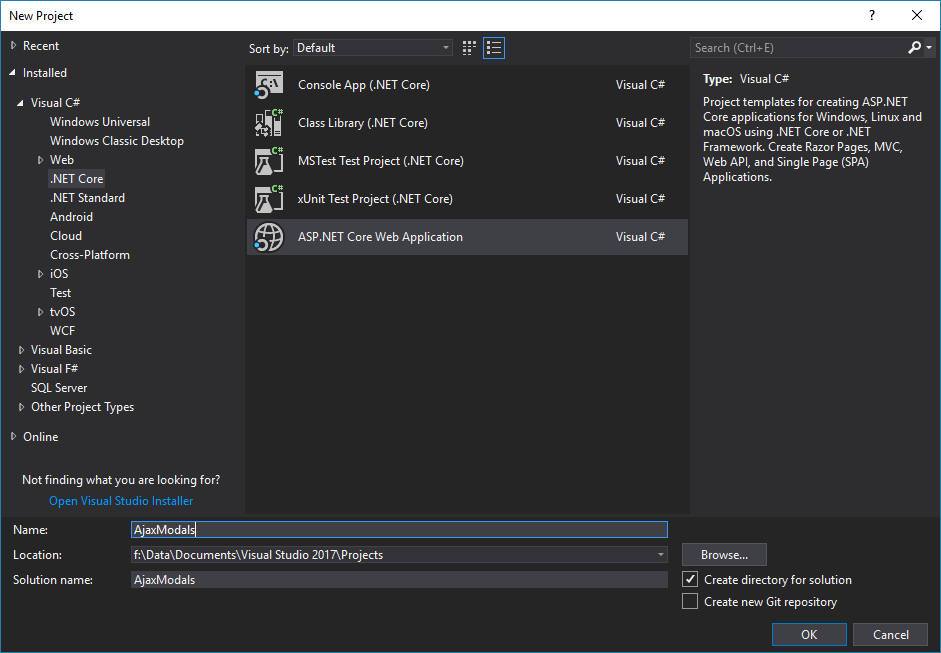
Firstly we need to create a project. Go ahead and launch your Visual Studio (I’m using Visual Studio Community 2017). Create new “ASP.NET Core Web Application”. I named my Solution/Project “AjaxModals”.

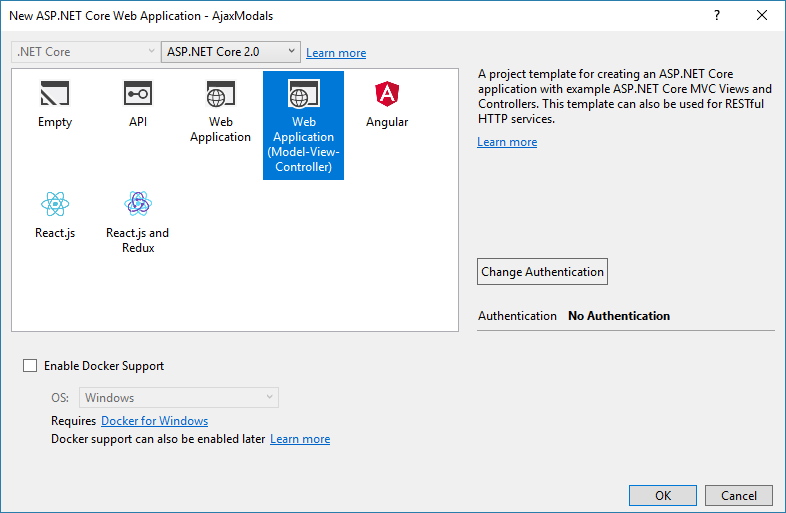
Then select “Web Application (Model-View-Controller)”.

This project inlcudes jQuery and Bootstrap already, but they are old versions. We’re going to replace it with newer version. We’ll go the simplest path which is to use a CDN. I’m also going to clean it up, so we’ll remove all unnecessary markup code. Firstly let cleanup main layout file and link required files via CDN. Open Views\Shared\_Layout.cshtml and replace its contents with:
| |
In this tutorial I’m not going to show you how to do client-side validation, we’ll only do server side validation. Nevertheless let us also update client-side validation scripts. By default client-side validation is based on jQuery unobtrusive validation. Go to Views\Shared\_ValidationScriptsPartial.cshtml and replace it with:
| |
Go to “Views\Home” and remove everything except Index.cshtml. Remove Index.cshtml file contents (but leave the file, we’ll need it).
Good, now we’re going to do some code cleanup. Open Controllers\HomeController.cs and remove About() and Contact() functions.
Overview
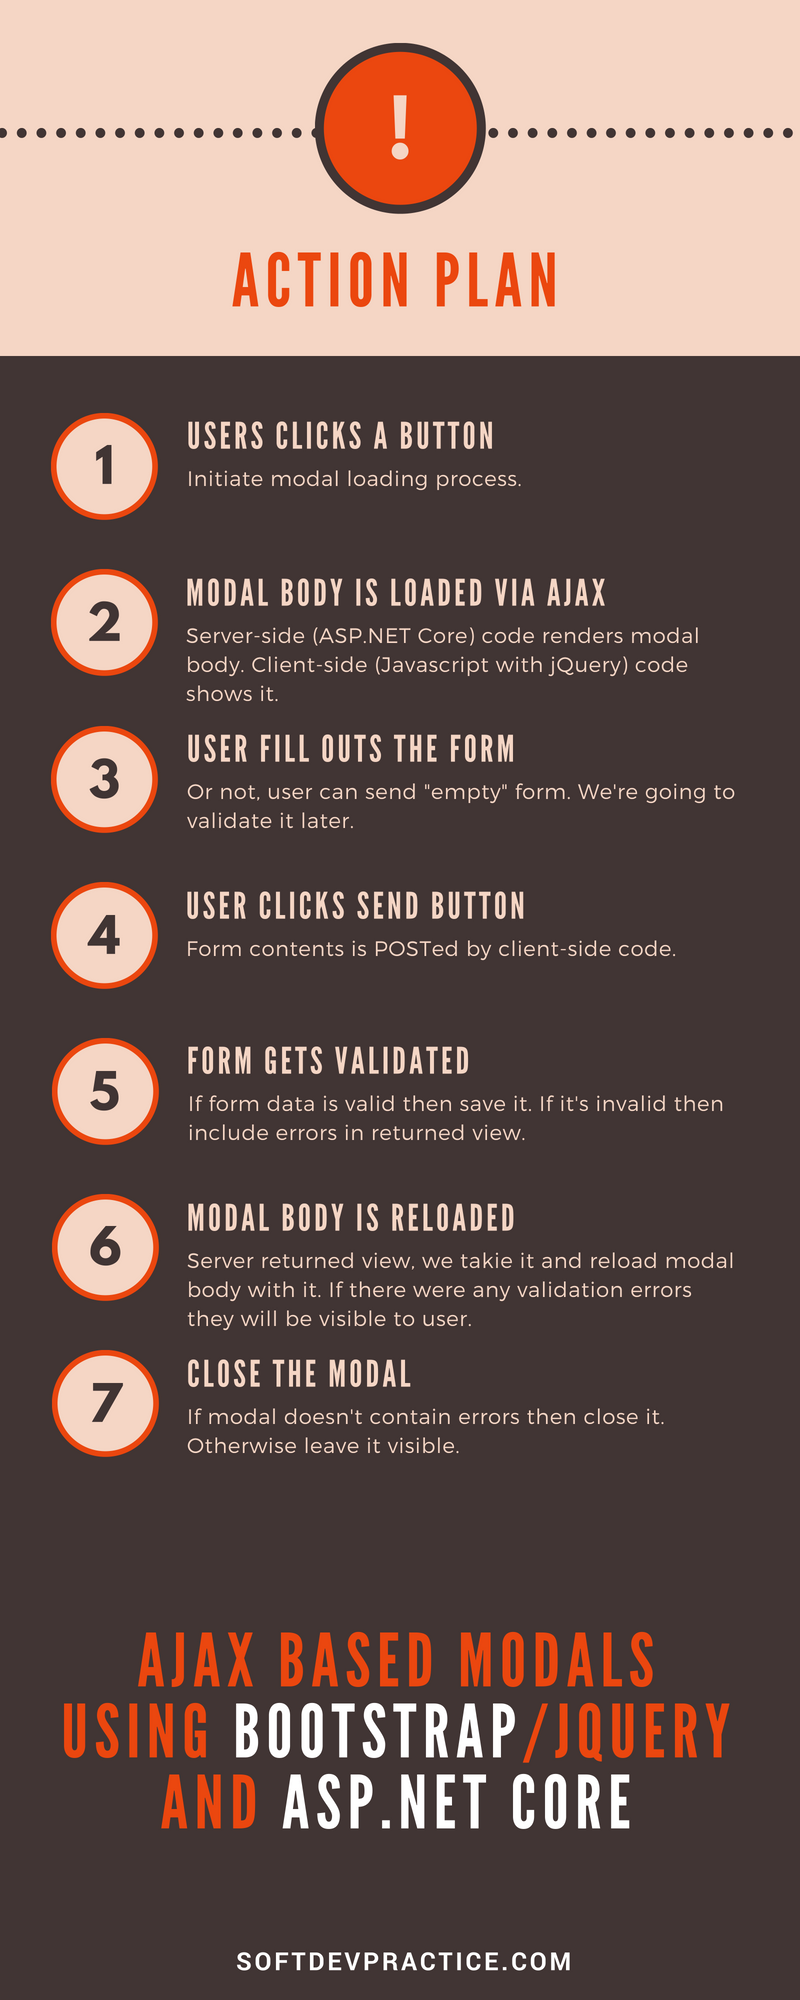
Here’s how it’s going to work.

Creating a modal
It’s time to create our modal. We’ll keep it simple for now. It will include a basic contact form with three input fields: first name, last name and email.
Let’s start by creating a new model (Models\Contact.cs) with following contents:
| |
We’ll also need an instance of this model inside our view (for now). Go to HomeController and modify your Index, so it will pass an instance of Contact into the view.
Let’s add a “Add contact” button which will open our modal window. I’m not going to dive into the html/markup here, if you’re interested go to bootstrap documentation here. Notice that there is a proper form inside and that we’re using tag helpers to create inputs.
| |
Loading modal form data via ajax
The modal we have right now is static. What we want however is to load the modal dynamically. Why? We could use it to edit existing contact. So we want it to be able to preload with given contact data.
We need a couple of steps to achieve this. Firstly we need to return a modal contents from controller. We’ll use PartialView to return only contents of given view, without the layout. To do this we’re going to create new method Contact and we’re going to move model creation from Index to it. Since we’re going to name the view a little bit different we need to pass it to the PartialView method:
| |
Then we’re going to move modal markup into separete view file Home\_ContactModalPartial.cshtml:
| |
This is what is left in Index.cshtml file:
| |
Alright, so we have separated the button (which opens the modal) which is in Index.cshtml view and the modal itself which can be found in _ContactModalPartial.cshtml view, also both are in separate actions (Index and Contact). Now we’re going to make it possible to display modal after button click.
OK, this is how we’re going to make it work. Button will have additional data attribute to tell us which action returns the modal view. We’ll also change data-toggle="modal" to data-toggle="ajax-modal", because we want to open it with our custom code (and load it via ajax).
| |
Then we’re going to add some Javascript/jQuery code which will request (ajax) the modal view from controller and the we’re going to show it. Open up wwwroot\js\site.js file. Let’s start by adding some code to make sure that it’ll execute only after document.ready event:
| |
Good now add event handler to each button which opens modal:
| |
Inside the event handler we retrieve the url:
| |
Then the ajax GET request receives the modal body from controller/action:
| |
The last step is to display the modal. There’s one problem here. We have our modal HTML (received with $.get), but before we display it we need to attach it to the page DOM somewhere, to make it’s a part of page structure. Right now it’s just a variable in memory. In order to do that we’re going to create placeholder div, which will contain loaded modal markup code, so modify your Index.cshtml:
| |
Then we’ll load it with modal and then we’re going to display it:
| |
Just to make sure, let’s see how our site.js file should look like by now:
| |
We have dynamically loaded modal. We’re done here.
Before we move on let’s refactor our JavaScript code a little bit. We can reuse reference to placeholder. It will be needed in next steps:
| |
Saving modal form data via ajax
Our modal doesn’t do much yet. Our next step is to send form data to the controller. There are however two difficulties which we need to solve. First one is that we want to send it in the background (as an ajax request) and the second one is that the modal “Save” button is outside of a form tag. The good news is that it’s easy to do with jQuery.
Firstly we need an action to process data. It’s going to be an POST request which will send us contact data. Let’s add another method in HomeController.cs:
| |
Nothing interesting here, for simplicity sake I’m not going to introduce ORM/DB here. We’ll just create a static list of contacts. Just to get it saved somewhere. Drop this line into your controller:
| |
Also we’ll need to add new contact once we receive it:
| |
Now for the jQuery part. We need to attach click event handler to a button which will send whole form. Correct element to attach to is a “Save” button. We’ll identify it by an additional data-attribute (data-save="modal"). Once user clicks “Send”, it should either show errors or disappear in case of success.
| |
We need to rememver that the whole modal is dynamic. This means that the every event handler is going to get removed after new HTML is loaded with ajax. There are two ways to fix this. First way is to always attach event handler upon ajax load and the second one is to use on jQuery function which allows us to attach event handler to element and filter the descendants of the element that will trigger the event. I’m going to take the second route.
| |
What’s the next step? Well, we need to get form data and then send it. I’m not going to explain this step too much. We’re simply going to navigate DOM in order to find a form tag located inside the modal. Then we’ll extract form action url. We’re going to get form data and make it eligible for sending (serialization) then we’re going to send the data to server. Once we receive response we’re going to close the modal. This is how our code looks like now:
| |
Now go ahead and check how this work. If you set breakpoint inside Contact (POST) you’ll see submitted values, you can as well verify that contact has been added into static list we’ve defined earlier.
Validating modal form data via ajax
It’s time to make sure that the data we’re processing in controller/action is valid. Unfortunately as it is for now, users can add new contact with empty name or empty/invalid email.
The easiest way to add validation to modal is data annotation attribute. If you never heard of those, then let me just tell you that data annotation attributes are speciall class which we can use to decorate properties. There are many built-in attributes, but we’ll only need two. Required attribute to make sure that first and last name are not empty and EmailAddress attribute to make sure that the email field has a valid email address.
| |
Valiation occurs automatically. In order to check validation state we use ModalState.IsValid property available in controller. Let’s make sure that new contact is saved only in case of a valid model:
| |
You can verify that it’s working as expected by setting a breakpoint there.
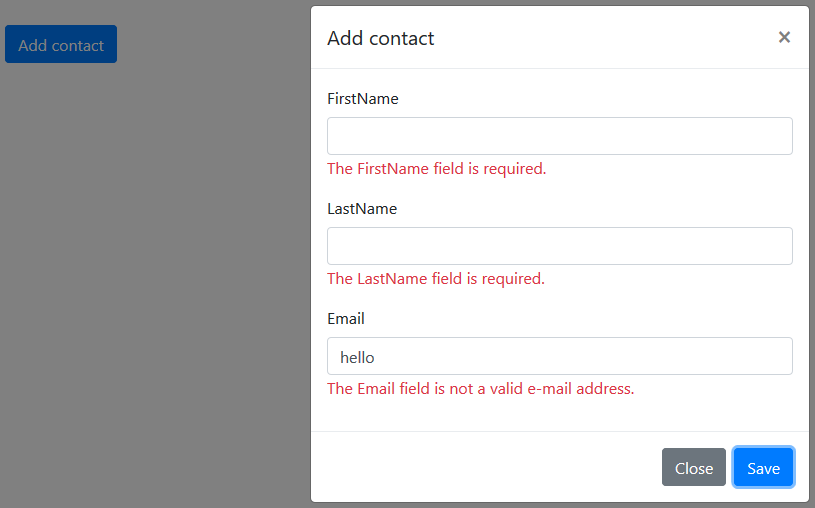
We’ve got it checked. It also should show some errors in the front-end. Partially we alerady have that. Contact action already returns view with errors. Validation tag helper renders error messages. It is already included inside form:
| |
The only reason we’re not seeing those errors is that we’re not showing them. Once we receive response from server we’re simply closing the modal window. But leaving the modal panel open is not enough. We still need to copy modal body rendered by the server, because it contains error messages.
To sum it up. Once user presses Save button a request is made to HomeController/Contact action. Action validates it and if everything is OK saves it into static list. Then it returns a view (full modal HTML), including errors if validation failed. Then we receive response inside script. We need to extract modal body from the response and replace current modal body with the one from response.
| |
Closing modal when it has been saved without errors
There is only one more step we need to do. At them moment modal will show errors if there were any validation error or empty modal on success. We want to make sure that the modal dissapears upon success.
Firstly we need to find a way to differentiate a modal which succeeded from the one that failed. Since we’re already processing modal HTML, we can also include a hidden input field which will tell us wheter ModelState is valid or not. The very same ModelState.IsValid property from controller can also be access inside view:
| |
The only thing that is left is to check the value of the hidden field. We need to do this once we receive modal:
| |
It’s done! Check your solution. Now you know how to create dynamic Bootstrap modals using ASP.NET core. Check full source code here.

Further improvements
You can do much more with modals. Check out the second part here if you want to learn how to:
- upload files
- display notifications
- view added data
- learn some more tricks